11. RELOCATE INSTALLED SOFTWARE TO ANOTHER DRIVE
11. RELOCATE INSTALLED SOFTWARE TO ANOTHER DRIVEMany Windows computer users with small SSD system disks (128 – 256 GB) are falling into the same trap: Although the initial hardware requirements for the operating system installation seemed sufficient with these disks (about 20 GB for Windows 7/8 and 40 GB for Windows 10), the continued usage of Windows OS gradually uses up any free space left on the disk.
At first, Windows users feel safe installing software on their default drive, even when it only has 128GB of storage space. In addition, Windows updates, drivers, settings, application and system caches, logs and user files are all saved on the system disk as well. After 1-2 years of running Window OS with a small SSD, most Windows users run out of free space on the system disk.
While it is possible to free space by moving personal files onto an additional larger disk, about 80% of space on the system disk would be still occupied by installed software and system files.
Uninstalling and reinstalling software on a new disk seems like a tedious and error prone solution in this situation. The better solution would be to relocate installed software to a new disk as-is. Eventually, Windows provided a built-in technology that makes such relocation possible. The technology, called junction points, allows a Windows user to anchor the paths of some source folders on one disk to the target folder on another disk. Users can free up space on their system disk by moving application folders’ content to another drive and anchoring their original locations to the new folders. This allows them to keep the rest of their application components like shortcuts, registries, and configurations.
PickMeApp provides an intuitive and user-friendly solution to move installed programs to another disk. Once a user chooses to relocate one or several installed applications, PickMeApp takes on all necessary operations necessary to perform the relocation of an installed software.
PickMeApp calculates required disk space, identifies application folders that are safe to relocate, moves applications folders to a new destination, cleans up leftover data and confirms application integrity after relocation. PickMeApp may undo any unsuccessful relocation and keeps the computer save state throughout the relocation process. In some cases, restarting the computer and running PickMeApp again is required to complete a relocation.
Relocated software works seamlessly with management operations such as running, terminating, capturing, uninstalling, and upgrading installed software. After uninstalling an application, PickMeApp will cleanup any leftover application data and will preserve relocated applications after the upgrade in most cases. Users can always revert the relocation by installing software back to its original installation location.
PickMeApp supports relocating applications on all Windows operating systems with NTFS drivers, starting from Windows XP SP3 and up. By using PickMeApp to move applications on another disk, users will effectively free up 95-99% of system disk space that was previously occupied by installed applications. In future releases, PickMeApp will provide a solution for freeing even more space, which will further prolong the life span of Windows computers with small SSD disks.
11.1 Relocation settings
11.1 Relocation settingsTo enable the relocation feature, select a destination drive in the Relocation Tab of the Settings menu. The destination drive is used as the destination for relocated application files and folders.
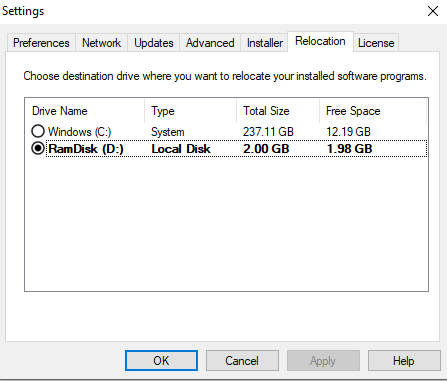
The Relocation settings tab shows a sorted list of compatible drives available on the computer. The first drive on the list is the drive with the most available storage space. The drive that is currently chosen as the destination drive is show in bold.
The list does not include non-NTFS and removable drivers. No drive can be chosen if there is only one compatible drive available on the computer, and the relocation feature is disabled. A driver without free space cannot be chosen as a destination drive.
Note: The relocation feature is enabled on computers with two or more non-removable NTFS drivers.
Select the destination drive in the drive list and press the “Apply” or “OK” buttons to save your choice. From that point on, any new relocations are done on that destination drive. The PickMeApp Session log will then show the following message:
“Drive <name of drive><Disk Label:> was chosen as relocation destination.”
Note: If a destination driver was deleted, select a new destination drive to enable the relocation feature.
11.2 Relocate installed Application
11.2 Relocate installed ApplicationRelocate Single Application
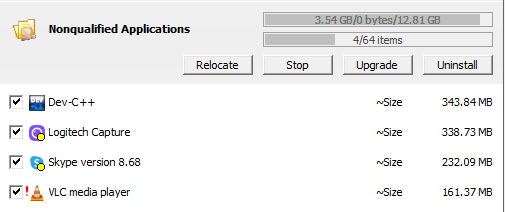
Once a destination drive is chosen, you may start the relocation of a single application by pressing the “Relocate” button available on the Application Bar of any installed application (Qualified and Non-Qualified).
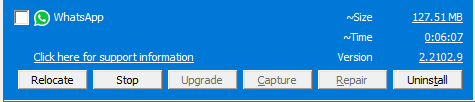
Note: You cannot relocate an application that is originally installed on the destination drive (e.g., disk C:).
PickMeApp starts the relocation of an installed application by ending all running application processes. Please make sure you have saved all application documents prior to starting the relocation process.
The relocation may last from a few seconds to several minutes, depending on the size of the application and speed of the source and destination drivers. In some cases, you may experience a short period of desktop flickering. This happens when PickMeApp is trying to release some locked files prior to the relocation.
Note: It is important that during relocation, the computer is not accidentally switched off (e.g., pressing the power button), otherwise the application may end up in a non-operational state.
Software suites (e.g., Microsoft Office) are handled as a single application. All applications in a software suite are relocated at once.
In some cases, you may be prompted to restart your computer and to run PickMeApp again to finalize the relocation of applications. You may restart computer once per several relocations.
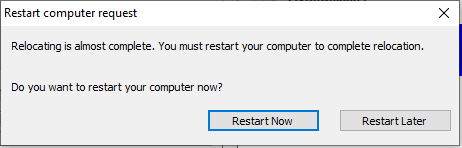
Make sure to run PickMeApp again after the computer restarts. PickMeApp Light and portable PickMeApp Pro users must manually run PickMeApp again. PickMeApp Pro users that enabled starting PickMeApp during computer startup will have the PickMeApp automatically restart.
Relocate Several Applications
PickMeApp Pro can relocate several selected installed applications at once.
Select the applications that you want to relocate and press the “Relocate” button available on Qualified and Non-Qualified applications profiles. The selected applications are now relocated one by one. You can stop or skip the relocation of applications during the process.
Make sure to restart the computer and run PickMeApp again if at least one application relocation requires a computer restart.
Relocated Applications Filter
You may find relocated applications by applying the <relocated> filter in the Filter Bar.

The <relocatable> filter helps find applications that can be relocated to the destination drive. The filter excludes applications that are installed on the current destination drive (e.g., disk C:).
Relocated Applications Info
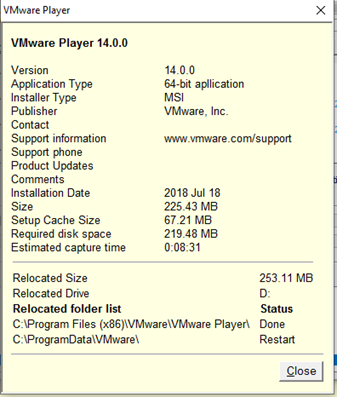
To see detailed information about a relocated application, click the “Support information” link at the Application Bar, along with other detailed info about the application the dialog provides:
- The size of the relocated folders (the freed-up space from the original disk)
- The destination drives.
- The relocated folders and their status
11.3 Remain Relocated Application
11.3 Remain Relocated ApplicationRemaining applications means to return application folders to their original location after relocation.
After an application is successfully relocated, the font color of each relocated application is changed to blue font and the Relocate button is changed to the Remain button.
Note: The Remain button is disabled for relocated applications waiting for a computer and PickMeApp restart.
The Remaining action is very similar to the relocation of application. The remaining process may last from a few seconds to several minutes, depending on the size of the application and speed of the source and destination drivers. In some cases, you may experience a short period of desktop flickering. This happens when PickMeApp is trying to release some locked files prior to remaining the application.
Remaining applications may require restarting the computer to clean up the remaining data from the relocation. In such cases, PickMeApp prints information message inside the Session Log. The “Restart” pop-up is not shown.
Note: The remaining application fails with an error message if there is not enough space left on the original drive.
Note: You can only remain applications one at a time. There is no batch mode available for remaining applications.
11.4 Creating System Restore Points
11.4 Creating System Restore PointsWe strongly recommend creating Windows Restore Points prior to relocating an application. PickMeApp Pro users have access to the “Create Restore Points per PickMeApp Action” feature described here: (link).
To learn more about how to create Windows Restore Points, follow this link: (link).
11.5 Command Line Interface for Relocate
11.5 Command Line Interface for RelocatePickMeApp Pro users can run relocate and remain actions using command line. Two new CLI switches "/r" and "/m" are available to relocate and remain applications (see the PickMeApp CLI for more info).
It is possible to relocate a previously relocated application to another drive by using CLI. This option is not available via PickMeApp UI.
11.6 Managing relocated applications
11.6 Managing relocated applicationsRunning and Closing relocated applications
There should be no difference in running or closing a relocated application. You can create shortcuts and add them to the start menu the same way as you would with a non-relocated application.
Uninstalling relocated application
The best way to uninstall a relocated application is to use the PickMeApp Uninstall Feature described here: (see link)
To allow a proper clean up after uninstalling a relocated application, make sure that PickMeApp is running during the uninstall process.
In a case when a relocated application was uninstalled while PickMeApp was not running, the application’s relocated files and folders might be left on the destination folder. A manual cleanup will be required in this scenario.
Upgrading relocated application
There are two scenarios for application upgrades:
- The upgrade setup overwrites application files by using new files without altering folder locations. The PickMeApp Relocate feature is designed to support the process in this case. The upgraded application is still relocated after the upgrade, although some new application folders might not be relocated.
- The upgrade setup uninstalls the old application and then installs the new application version. Currently, PickMeApp cannot distinguish that scenario from a regular uninstall. The newly installed version of the application is not relocated. To keep the application relocated, repeat the relocation process.
11.7 Relocation Feature Troubleshooting
11.7 Relocation Feature TroubleshootingIf you need to contact PickMeApp support about relocation or remain installed applications , please provide PickMeApp Support with the following files:
- Log files located at %appdata%\PickMeApp
- GDPR records located at the hidden folder $PmaData at %systemdrive%